Overview
Google Places enables you to search places and auto-fill company details.
Get data from the same database used by Google Maps. Google Places features more than 100 million businesses that are updated frequently through owner-verified listings and user-moderated contributions.
Note that your SuperOffice Administrator will need to sign up for Google Places before you can use it. Sign up here: https://my-googleplaces.infobridgeuniverse.com/Account/SignUp.
How to
Google Places is a Google Chrome extension, and can only be used in a Google Chrome browser.
Before you can use Google Places, you need to install it.
Install
Step1
Open up Google Chrome and go to the Google Webstore.
Step 2
When the pop-up window has opened up, click the button Add to Chrome.
Step 3
A small window will open with a request for some permissions that Google Places needs. If you agree with the requests you can click Add extension. If you don’t agree, you cannot use the Google Places.
Step 4
You will receive a notification saying that Google Places has been added to Chrome browser. You can start using Google Places!
Note: if you are a SuperOffice CRM On-premise customer, we need some connection settings and your SuperOffice CRM hostname before you can use Google Places. Inform your SuperOffice Admin who created your Google Places account to go to https://my-googleplaces.infobridgeuniverse.com/ to provide the settings. Please visit this article for more information
Step 5 (only if you have a blocking firewall in place)
If you cannot connect and have to gain access to your firewall please open your firewall.
Google Places uses the following IP addresses:
40.68.205.178
13.95.10.43
13.95.11.97
52.166.198.114
40.68.101.225
Use
Step 1
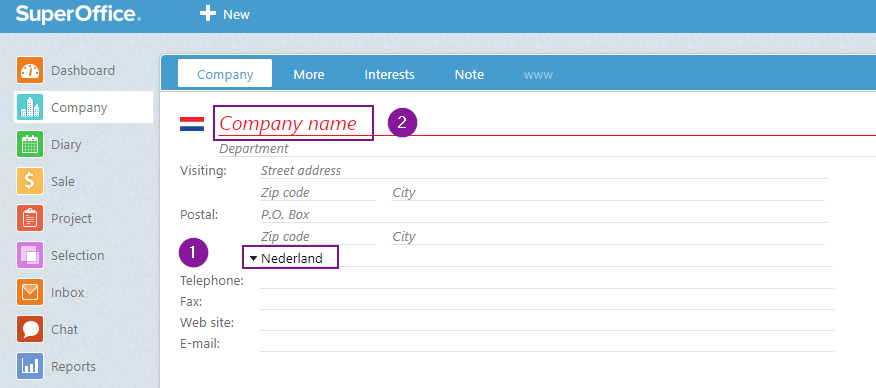
Go to SuperOffice CRM, or if you are already in SuperOffice CRM please refresh. Create a new company card and select the country where the company is located that you want to add. It is important that you first select the correct country because you will only see results from within the country that is selected.
Step 2
Start typing the company name. You will see a small window appear underneath the company name. These are search results that are found on the company name you typed. Once you see the correct company name, you can select the company. The available information will be filled in automatically.
When your company card is ready you can save it and you have added a new company card.


