Overview
DataBridge supports transformations for import and export files. Data transformations can be added to import and export jobs.
Click here to view the article on Transformations for DataBridge Export.
Note: Transformations can now be chained together so the field created by a transformation can be further transformed. More info
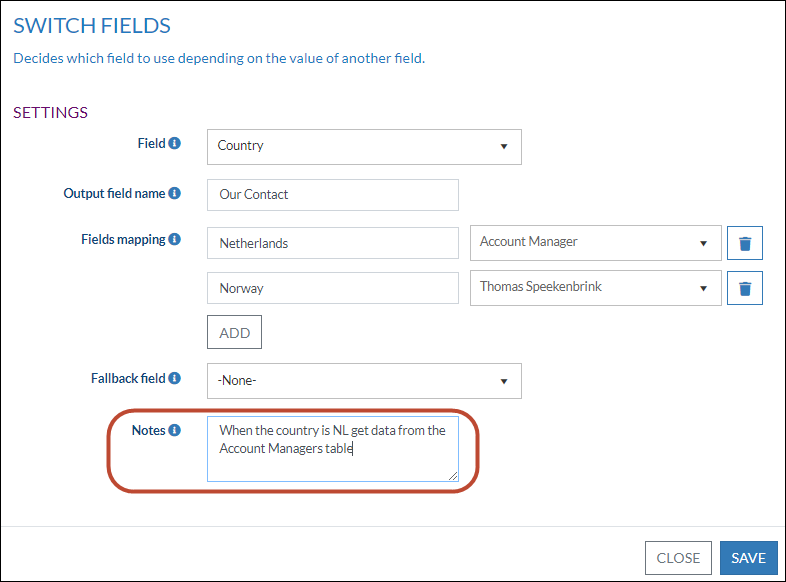
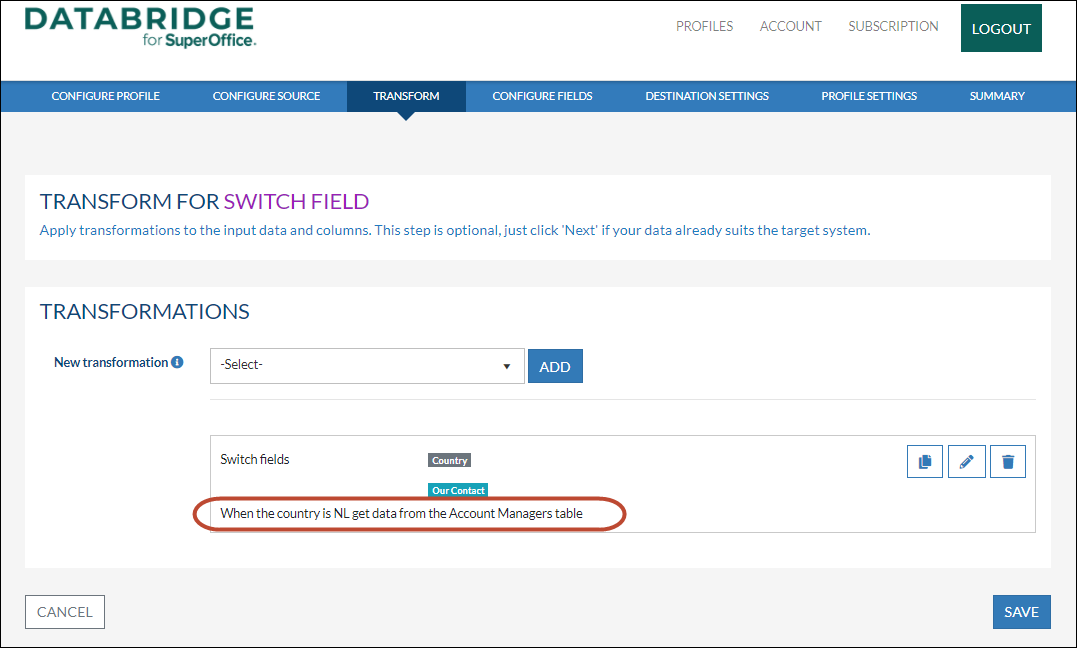
TIP 1: Notes can be added to transformations to make their purpose clear.
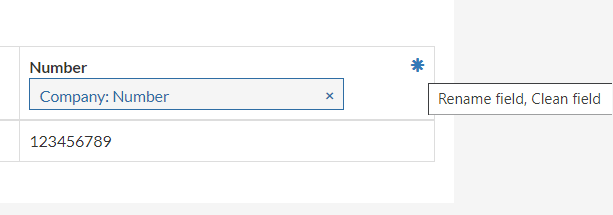
TIP 2: After you select a transformation and go to the Configure Fields page in your DataBridge Profile you can easily see which columns the Transformation have been applied to. An icon has been added with a tooltip that shows all the transformations applied to the column, in the order in which they are applied.
How to
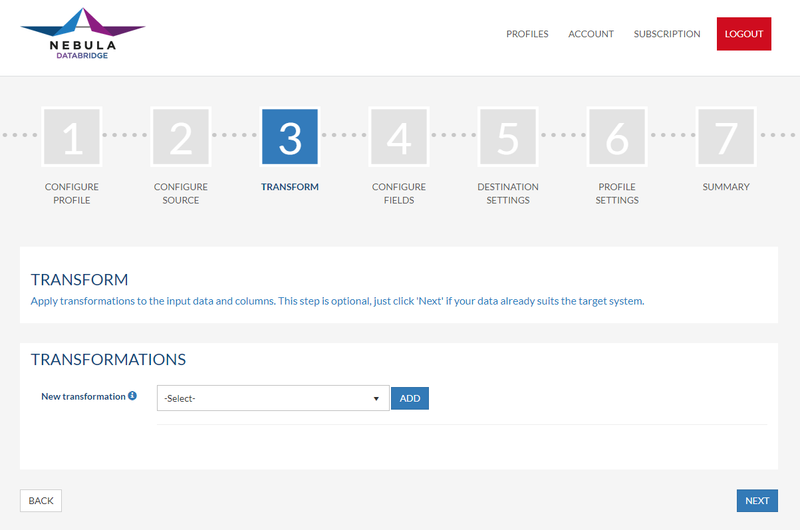
Create a new profile or edit an existing profile by clicking Manage profile. On the Transform page, select the Transformation you want and click Add.
The options to choose from are
Add conditional field | Create a new field with the value of the selected field. When the value of that field is empty, the value of the fallback field will be used. |
Add field | Add a new field with a fixed value. |
Append text value | Allows prepending and appending text to field values |
Clean field | Cleans a text field using a specific cleaning option. All cleaning options include white space, commas and periods. |
Copy field | Can be used for when you want one field from the source to map to multiple fields in the destination (for example: address which can be both visit and postal). |
Current date time | This transformation can be used to fill a field with the current date and time |
| Find Pattern | Find and extract the value from the field using the regular expression search pattern. Example: the ID between parentheses should be extracted from "Doe, John (AB12345)" |
Format text value | Formats the value in the field. |
| Map list | Converts each possible value of an input field into an item from a specific list in the destination. |
Merge fields | Merges the input fields into newly defined output fields. |
Remove fields | Prevents the selected fields from appearing in the output. |
Rename fields | Renames the title of the field and leaves the value unchanged. |
Replace | If the field matches the specified value it will be replaced by a new value. For example: if the input value is 'OK' it can be replaced by 'TRUE' and used to turn interests on. |
Skip | If the field matches the specified value the record will be skipped |
Split field | Splits a field with a separator and adds a new field with the selected segment(s) You can find a detailed description of this transformation here |
| Switch fields | Use this transformation to configure which field to import the value from depending on the value of another field. |
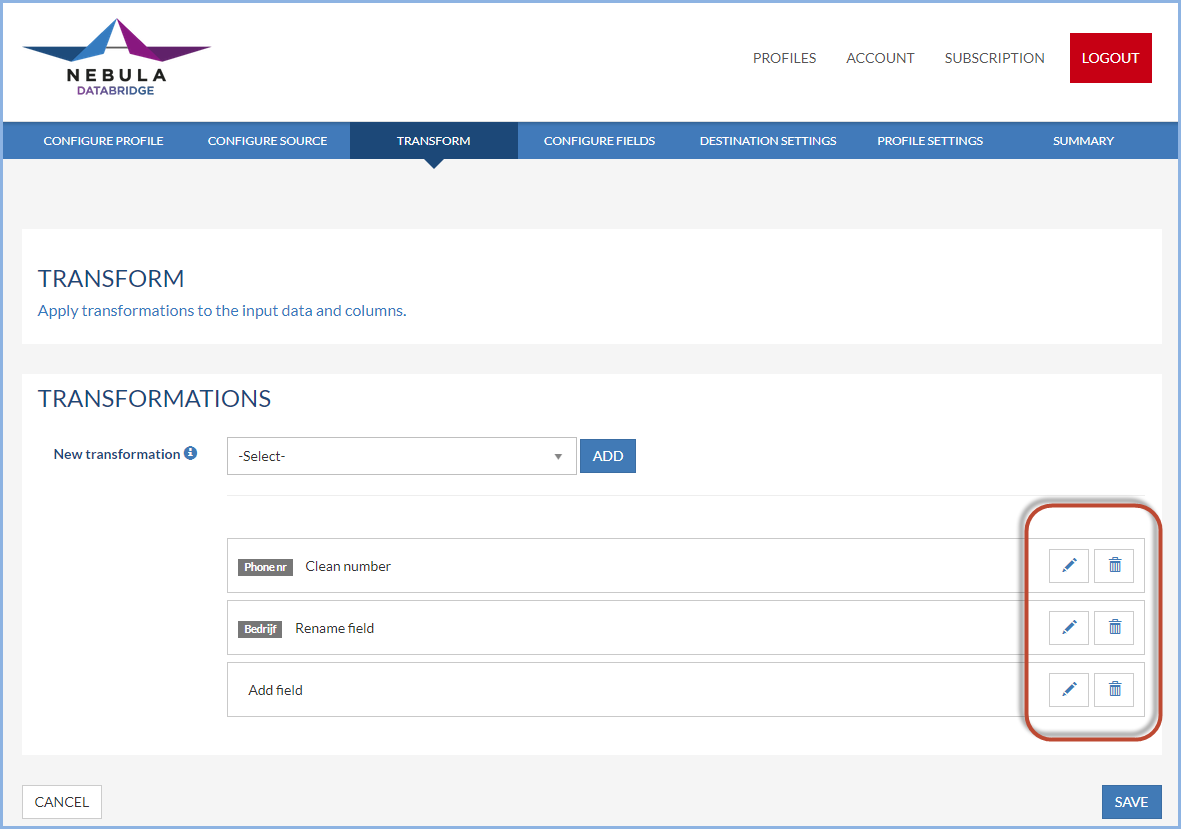
The added transformations can be edited or removed at any time, see below.
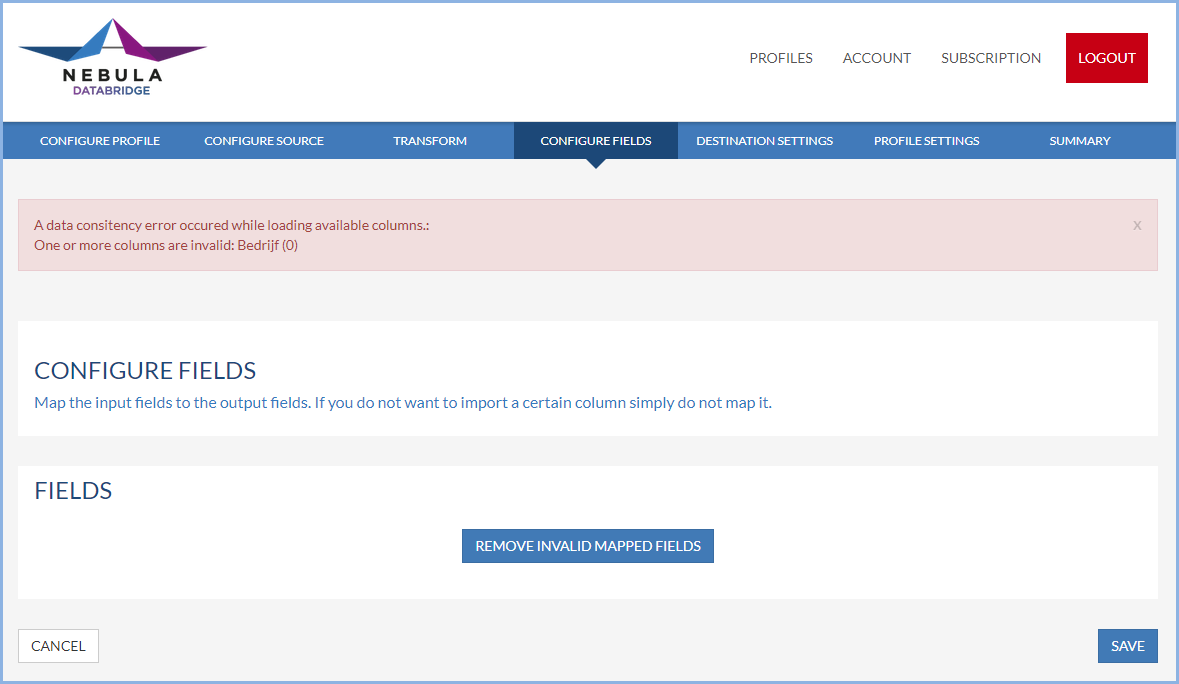
NOTE: If you are adding transformations to an existing profile with mappings in place and choose to use the Rename field transformation you will see the message as shown in the picture below.
This means that mapping is no longer valid, due to the renaming.
This can easily be fixed by clicking the Remove Invalid Mapped Fields button and map the field to the correct field.
THE OUTPUT RESULTS
Add conditional field
Create a new field with the value of the selected field. When the value of that field is empty, the value of the fallback field will be used.
For instance, you have an import file with data from two different external systems. In it there are two number columns, now you can say basically: when column 1 has records import those, when empty choose column 2.
Add field
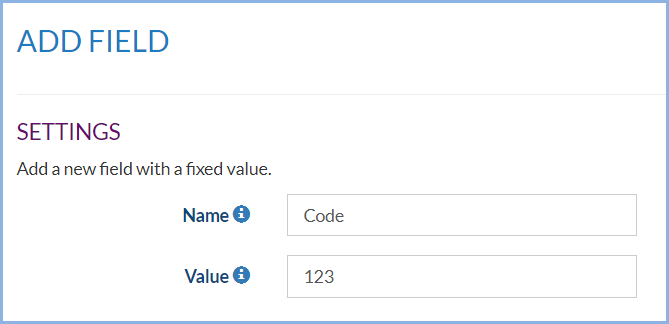
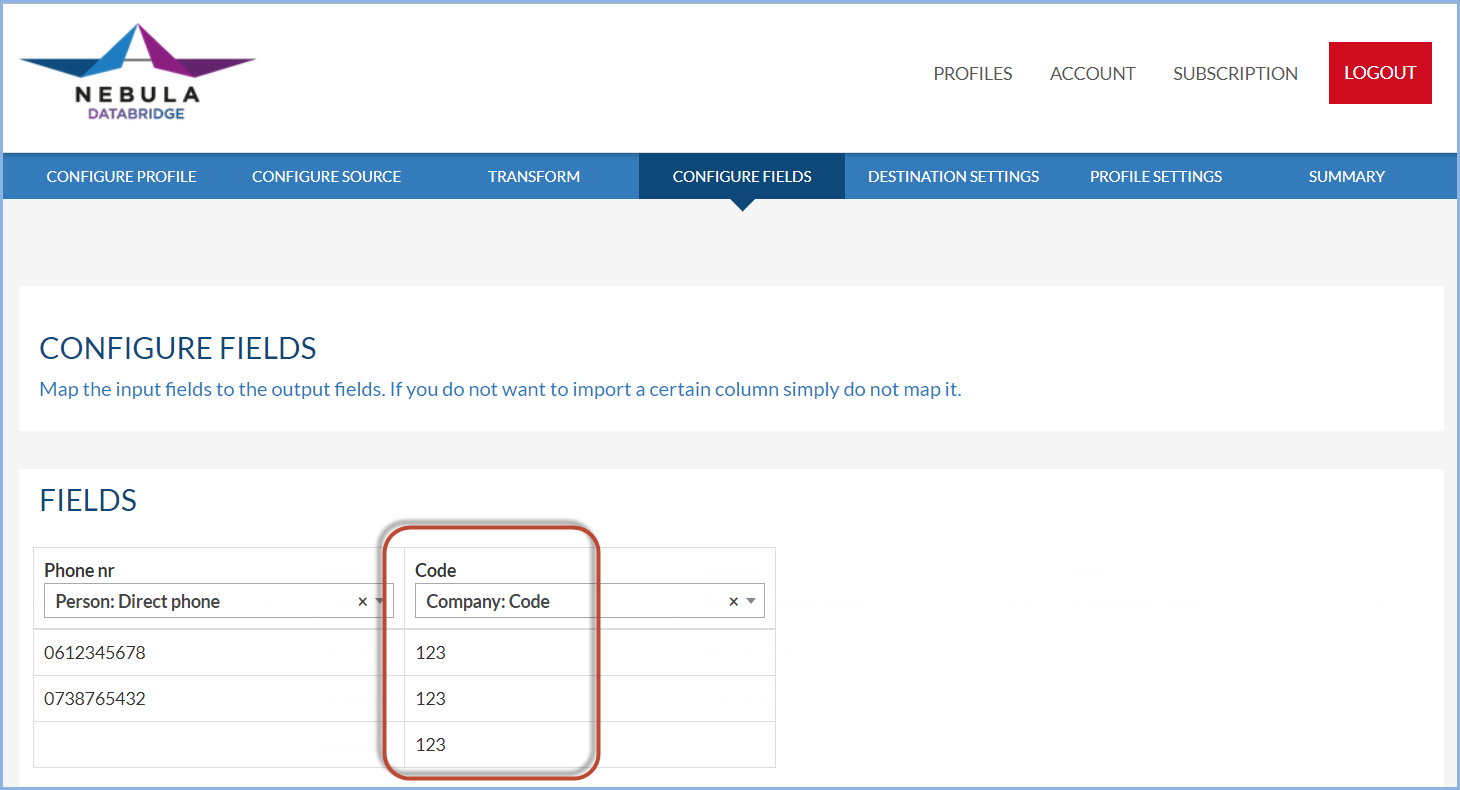
For our import, we have chosen to add a field Code with a fixed value 123.
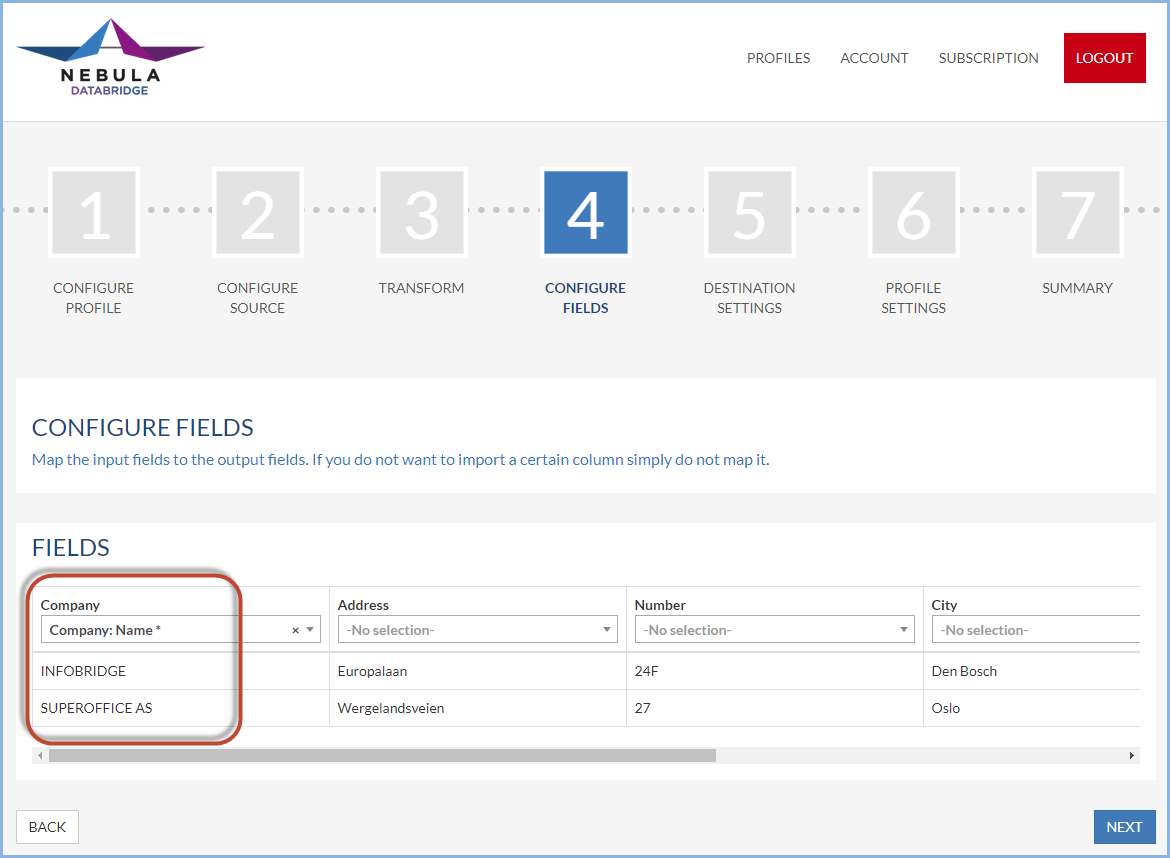
The result can be seen on the Configure fields page.
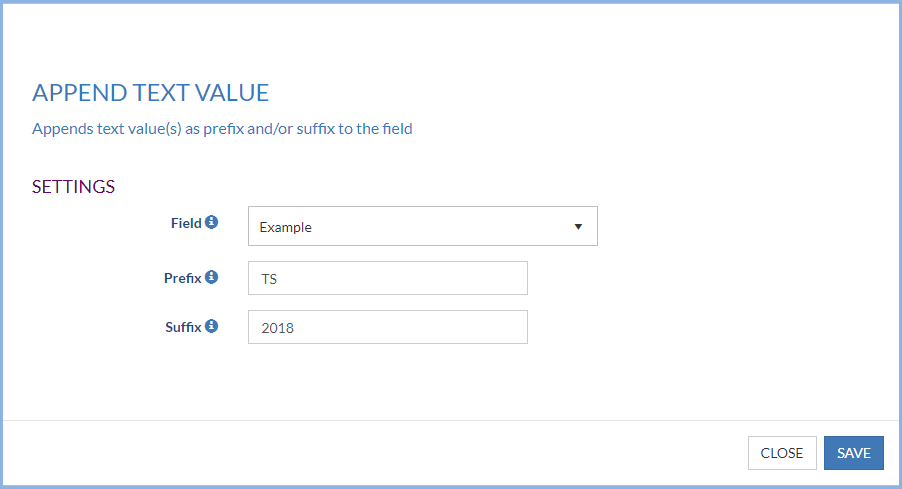
Append text value
The “Append text value” transformation allows for prepending and appending text to field values.
Clean field
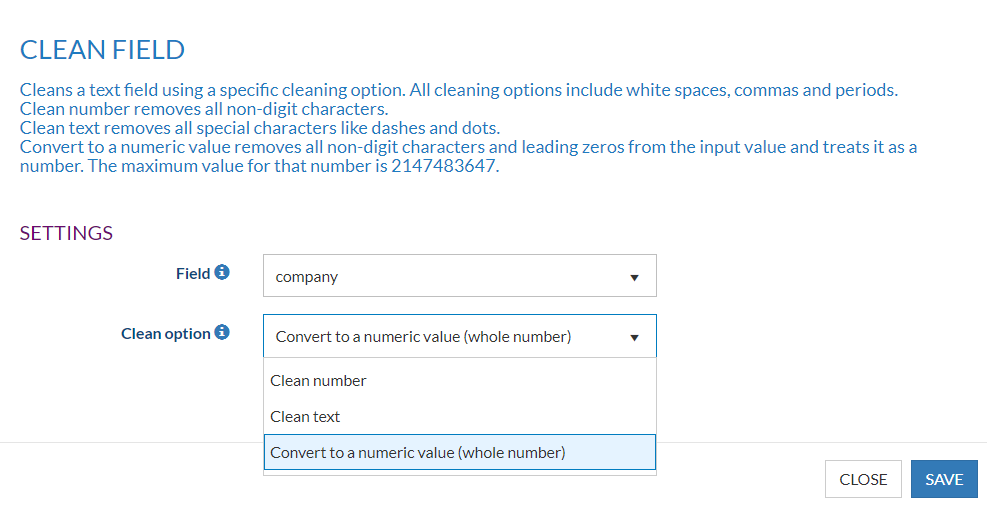
In the example below, we have chosen the transformation 'Clean field' to convert a value with leading zeros and non-digits to a numeric value.
In the Configure Source page you can see the original value in the preview
In the Configure Fields page you can see the result of the transformation, the leading zeros and non-digit characters are removed.
Copy field
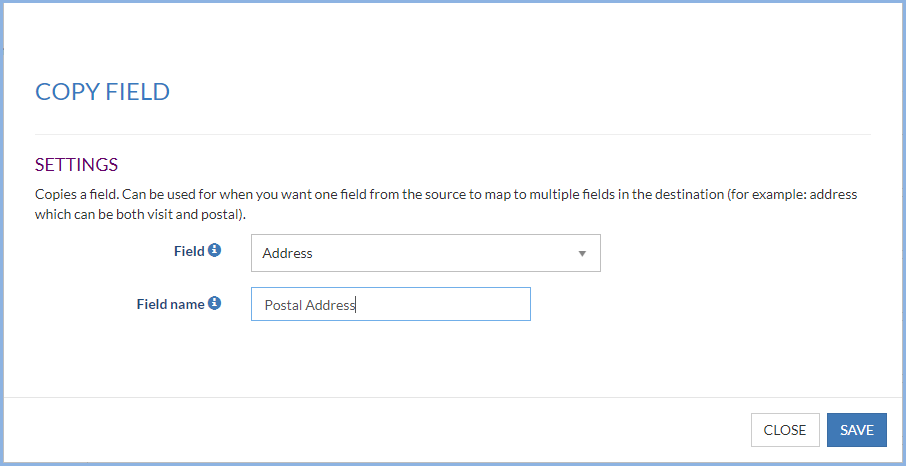
The Address field from the Import file will also be used for the postal address. This can be achieved by choosing the Copy Field transformation.
The result can be viewed on the Summary page. The Address column from the import file can be used twice.
Current date time
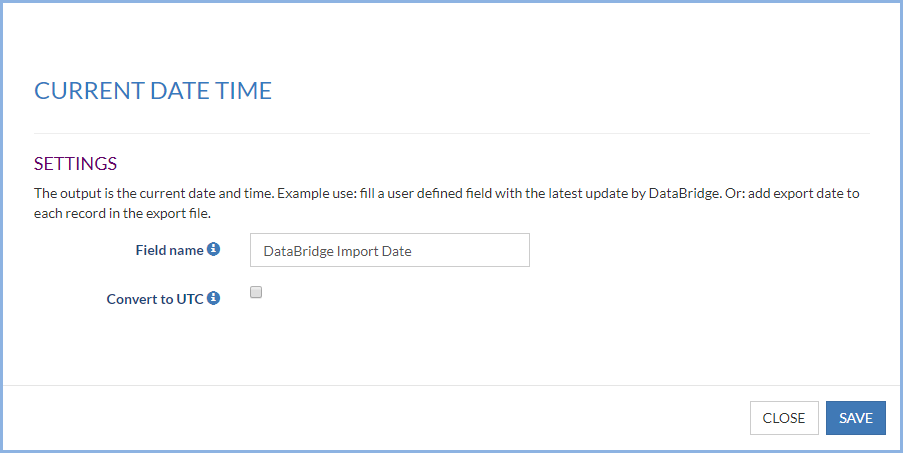
This transformation can be used to fill a field with the current date and time.
In this example, we will fill a user-defined field with the latest update by DataBridge.
First, choose the Transform 'Current date time' and fill in a field name.
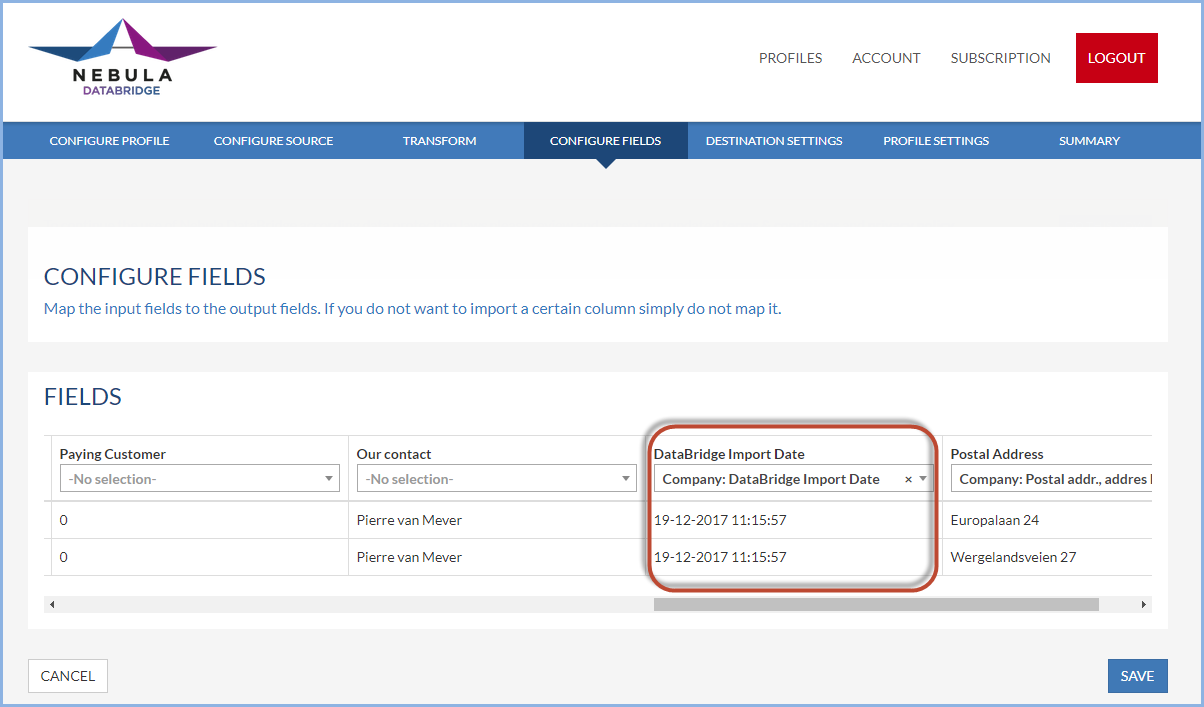
The next step is to map the new field to a SuperOffice field. In this example, we use a User Defined Field called 'DataBridge Import Date'.
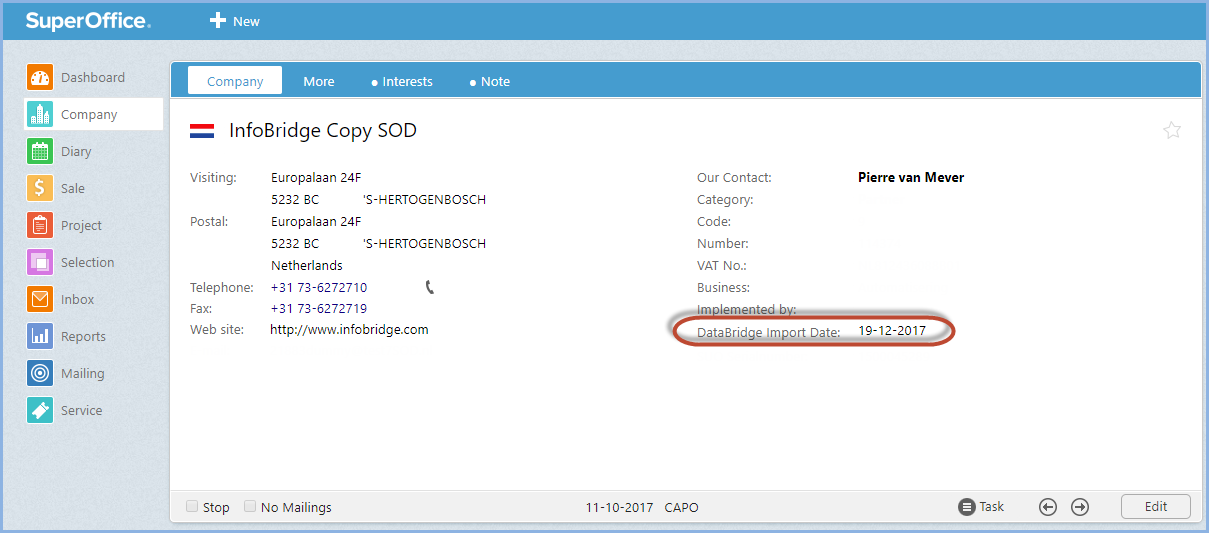
After running the Import job, the current date and time are filled in in the Udef of SuperOffice.
Find Pattern
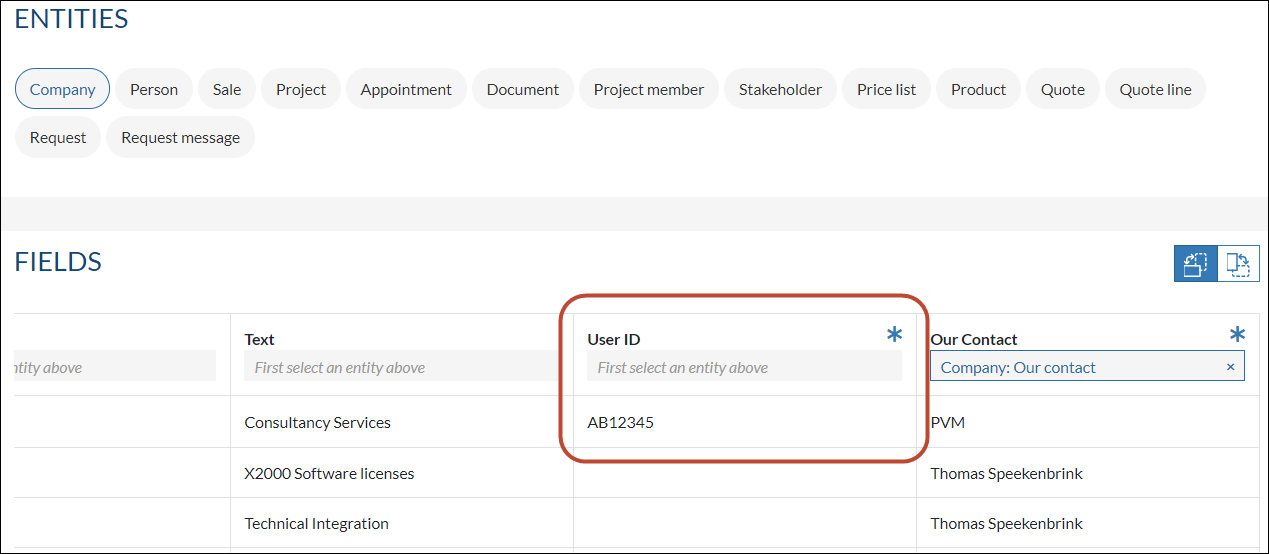
Find and extract the value from the field using the regular expression search pattern. Example: the ID between parentheses should be extracted from "Doe, John (AB12345)"
A regular expression is a form of advanced searching that looks for specific patterns, as opposed to certain terms and phrases. With RegEx you can use pattern matching to search for particular strings of characters rather than constructing multiple, literal search queries.
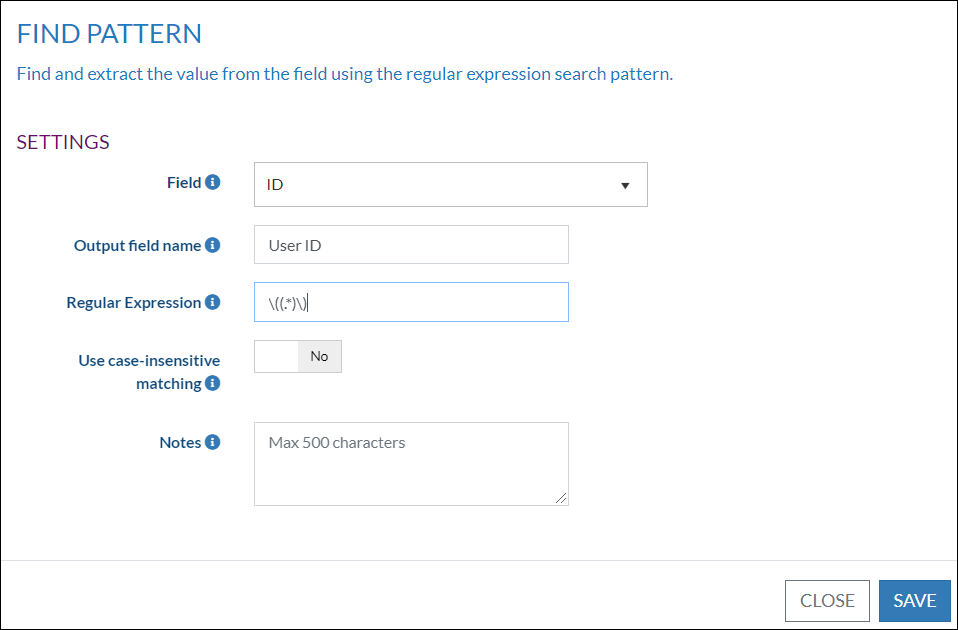
- Add the transformation "Find Pattern" and choose the field you want to extract the data from. In this example the field ID
- Choose a name for the Output field
- And fill in the RegEx you need. In this example I need Any data between the parentheses so I will use \((.*)\)
In the Configure Fields page in your DataBridge Profile you can now see the new field with the extracted data. It can now be mapped to the correct field in Superoffice.
Some other regular expressions which could have been used:
Exactly 7 characters between parentheses \((.{7})\)
At least 1 alphanumeric character between parentheses \(([A-Za-z0-9]+)\)
Exactly 2 uppercase letters, exactly 5 digits between parentheses \(([A-Z]{2}[0-9]{5})\)
Exactly 2 uppercase letters, exactly 5 digits [A-Z]{2}[0-9]{5}
At least 1 letter followed by a comma and a space, followed by at least one letter and a space followed by a parenthesis then capturing 2 uppercase letters and 5 digits followed by a parenthesis [A-Za-z]+, [A-Za-z]+ \(([A-Z]{2}[0-9]{5})\)
Note: We support two scenarios: (1) regex without any capturing groups and (2) regex with one capturing group
(1) Anything that match the pattern will be used as the value (my example before the last example)
(2) The value in the capturing group will be uased as the value (all other examples)
Please visit this page if you need some more detailed information about Regular Expressions (RegEx).
Format text value
With Format text value you can format the values in the chosen field. There are a couple of format options.
As an example let's use 'hello YouTube'
| Upper case | All in upper case | HELLO YOUTUBE |
| Lower case | All in lower case | hello youtube |
| Capitalize first | First letter in capital | Hello YouTube |
| Capitalize first decapitalize rest | First letter in capital, rest in lower case | Hello youtube |
| Capitalize words | First letter of each word in capital | Hello YouTube |
| Capitalize words decapitalize rest | First letter of each word in capital, rest in lower case | Hello Youtube |
| Trim | Trim will remove all leading and trailing white-space from the value in the fields |
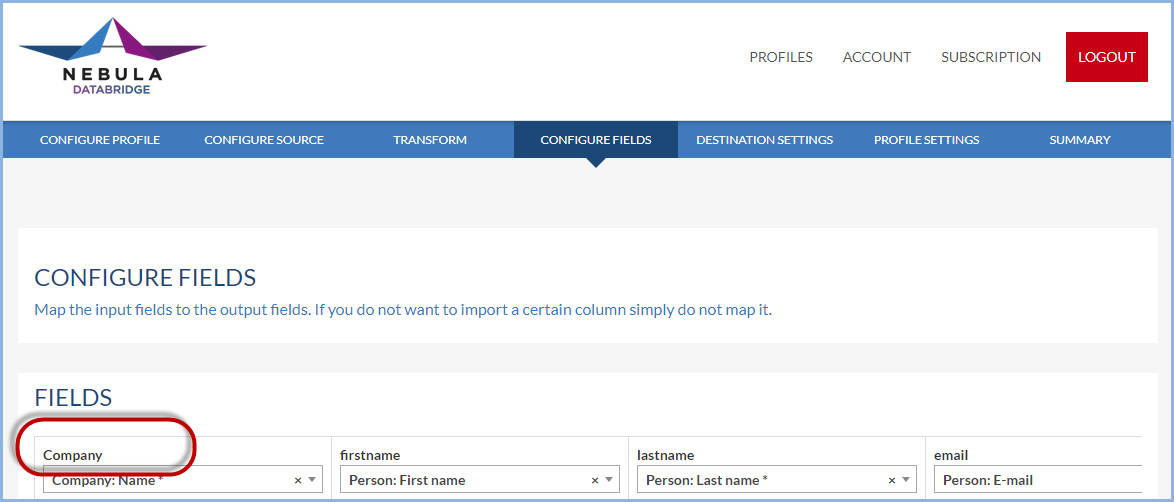
We have chosen the format 'Upper Case' for the Company field. And this is the result in the Configure fields.
Map list
Converts each possible value of an input field into an item from a specific list in the destination. This transformation is an enhancement for the Replace transformation so you do not have to use multiple Replace transformations anymore.
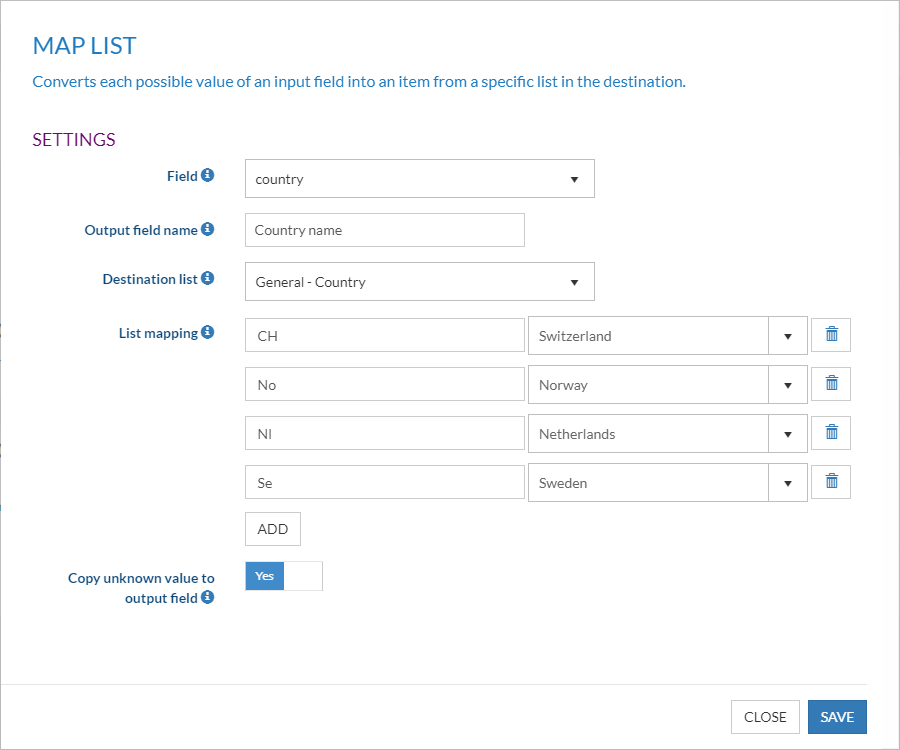
In this example below we want to convert the values in the Country column of the import file.
| Field | Select the field you want to use. In this example Country |
| Output field name | You can name the output field. In this example we choose Country name as output field |
| Destination list | Choose the list which values must be assigned to each input value. You can choose not to select a value and fill in your own values in the list mapping. |
| List mapping | Assign an output value to each input value. In this example we choose the country from the SuperOffice Country list Note: Only the first 15 unique records from the import file will be shown. You can add more manually with the Add button |
| Copy unknown value to output field | Select this option if the field contains a value that is not assigned and it should be copied to the output field. If not, the output field will be left blank |
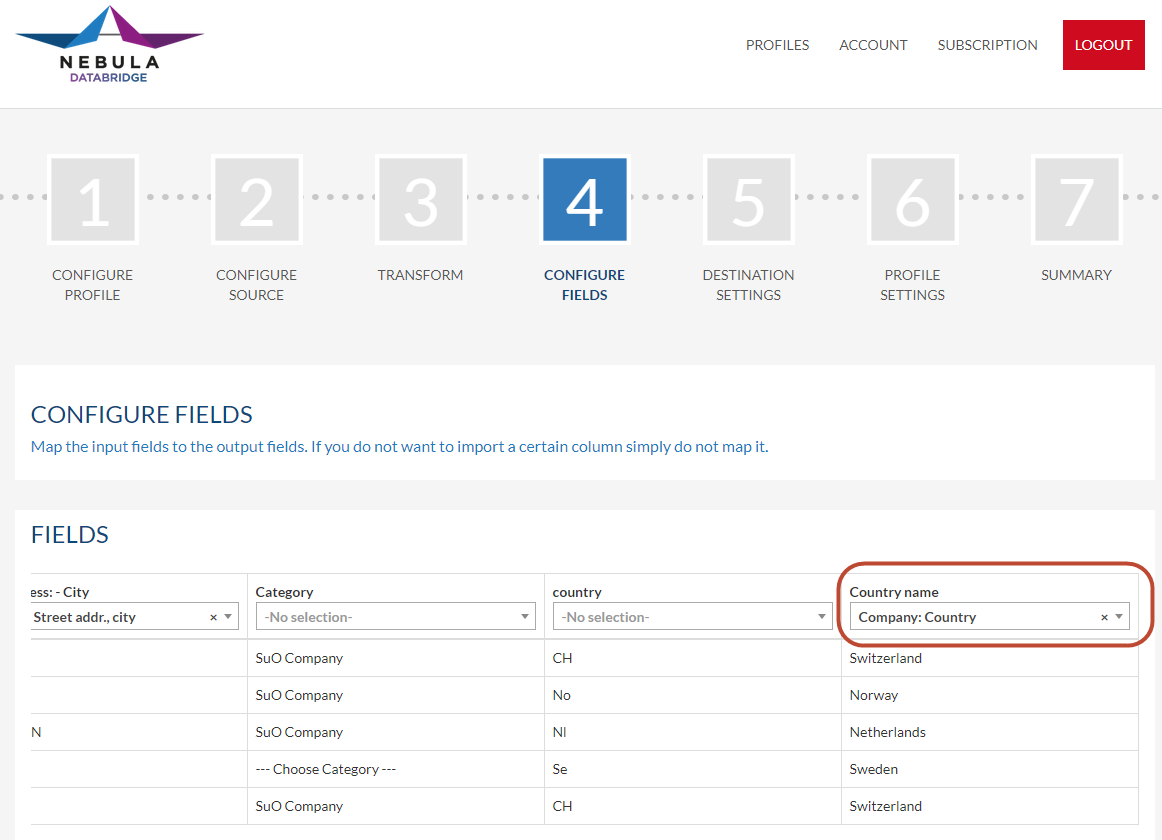
In the Configure fields page we can now map this new field.
Merge fields
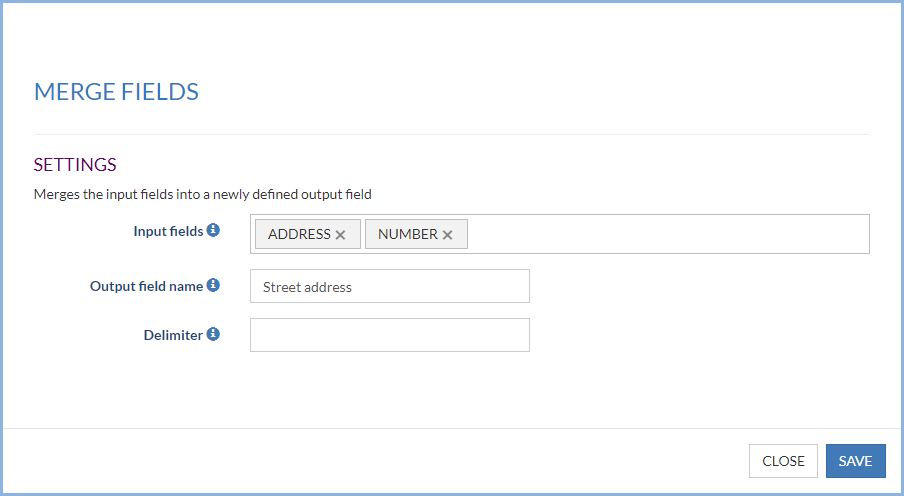
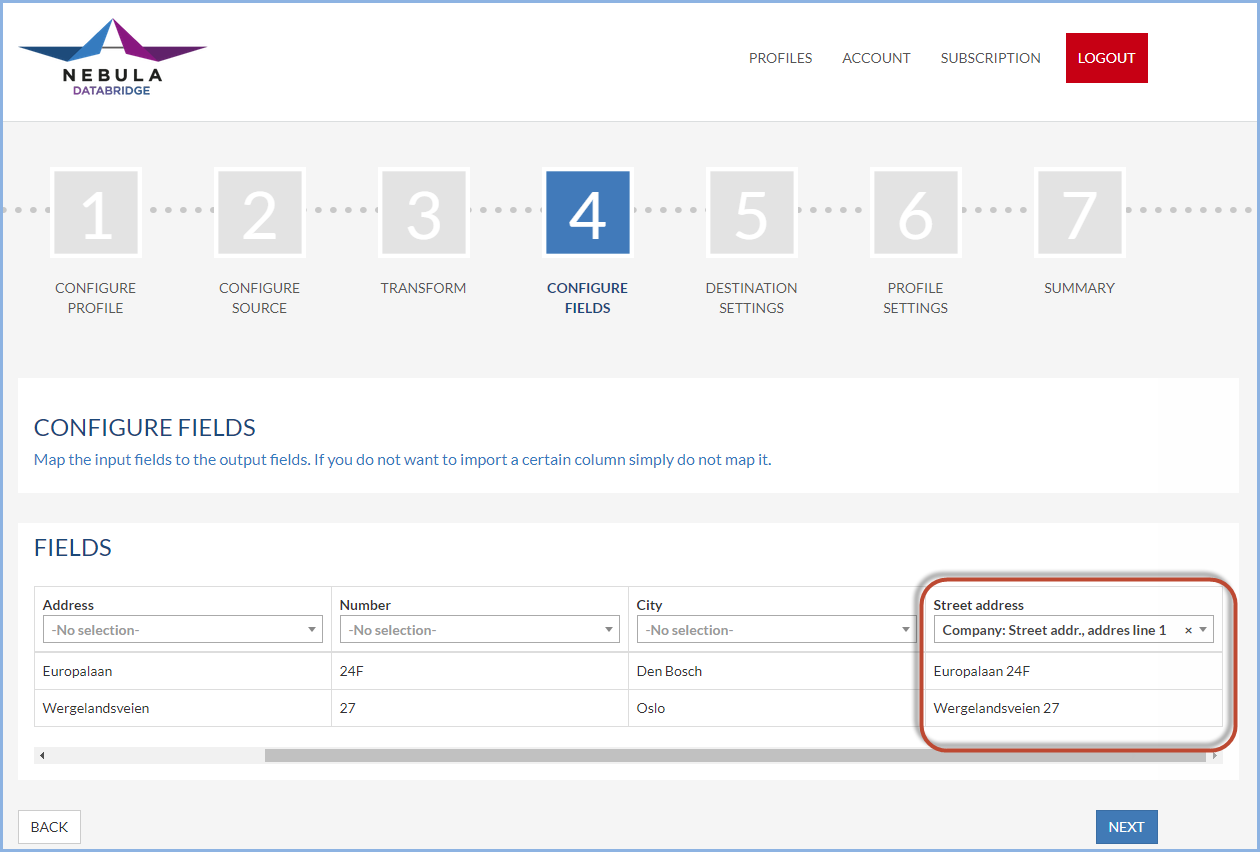
In this example, the fields Address and Number will be merged into a new output field Street address. As a delimiter, a space is used.
On the Configure fields page, you can see the result of the merge.
Remove fields
Prevents the selected fields from appearing in the output. This transform makes the most sense for Export, more info
Rename fields
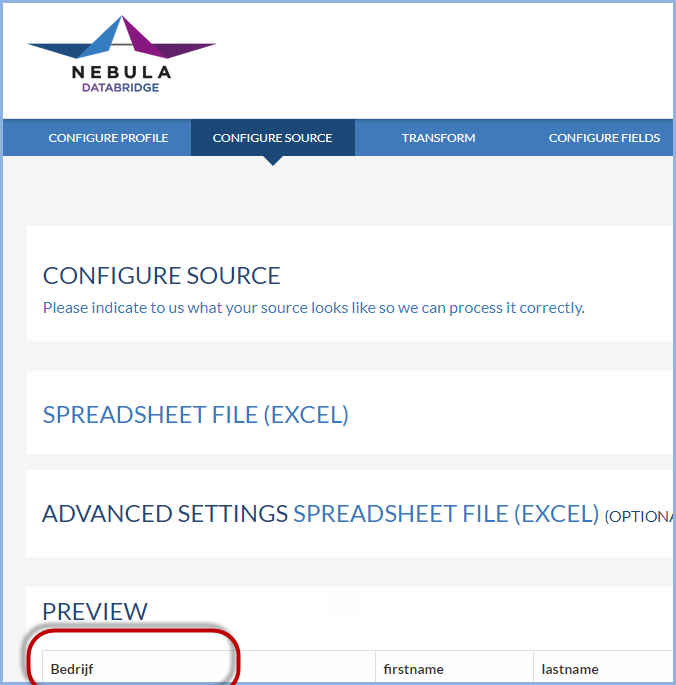
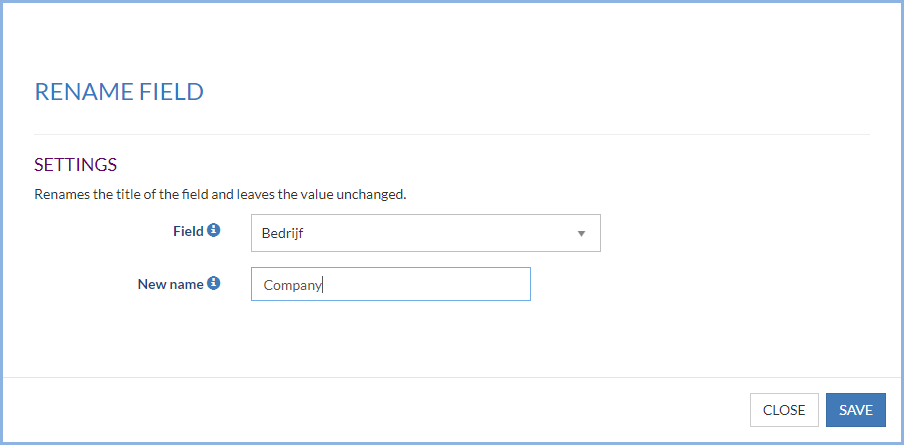
In the picture below you see the preview of a file with the column header 'Bedrijf'. With the transformation 'Rename field' we want to rename this column header from Dutch to English, to the column header 'Company'
The result can be seen in the Configure Fields page.
Replace
In this example, the values in the column Partner will be replaced when they match the value OK. This value will be replaced with True. This True value can be used to turn on interests in SuperOffice.
On the Configure fields page, you can see the result of the replace transformation.
Skip
With this transformation, you can choose to skip a record when a specified value is matched.
Split field
Splits a field with a separator and adds a new field with the selected segment(s)
You can find a detailed description of this transformation here
Switch fields
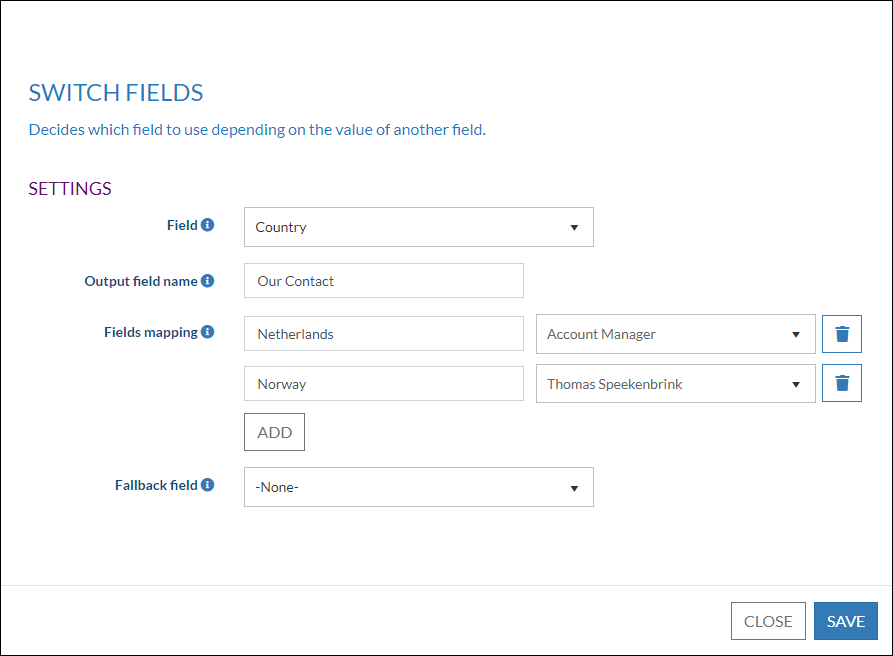
The Switch fields transformation can be used to configure which field to import the value from depending on the value of another field.
In this example the SuperOffice field Our Contact is dependend on the country of the imported company.
When the country is Netherlands, the person from the import file's Account manager column should be used. And when the country is Norway a fixed value (Thomas Speekenbrink) should be used.
More detailed information can be found here



.png?version=1&modificationDate=1693425814937&cacheVersion=1&api=v2&width=400&height=236)

.png?version=1&modificationDate=1693425814937&cacheVersion=1&api=v2&width=800&height=582)
.png?version=1&modificationDate=1693425814937&cacheVersion=1&api=v2)
